Using Existing Widgets
Finding Existing Widgets
- Check pypi
- Toscawidgets provides documentation for some of it’s released packages. Some of the docs contain Widget Browsers that allow you to play with the widget live.
- The Toscawidgets repository holds some widget libraries that have not been released. Use them at your own risk.
Tutorial
The overall process for using a widget is:
- Create a single instance of the widget (or compound widget), to be used throughout the program
- Pass this instance from the controller to a template
- In the template, call the widget to display it. Parameters can be passed at display time, and this is commonly used for the value of the widget.
For this tutorial we are going to create a star rating widget which utilizes ajax to store the user response and return a request back to the browser to update the user’s view.
Before we start using our widget we need to install it. For the time being, this widget has not been released to pypi so we need to install from the trunk.
easy_install tw.rating
import the widget into your project
from tw.rating import Ratings
Create the widget inside your controllers definitions.
my_rating = Rating(id='my_rating', action='rating', label_text='')
Create a new controller method to share our widget
@expose('genshi:myproject.templates.widget')
def testing(self, **kw):
    tmpl_context.widget = my_rating
    return dict()
In the template, call the widget to display it.
${tmpl_context.widget(value)}
Here is what the resulting widget looks like:

Now, star widget doesn’t do any good without some kind of server interaction. For this tutorial we are going to just simply keep track of the average as the user’s click the stars in memory. This could be later modified to support some sort of crafty database interaction.
First, lets initialize our “database” of star-click averages:
sum_ratings = 0
num_ratings = 0
Then we make a newly exposed method which shares the same name as the “action” which is sent into the Widget.
@expose('json')
def rating(self, rating):
    global sum_ratings
    global num_ratings
    rating = int(rating)
    sum_ratings += rating
    num_ratings += 1
    rating = float(sum_ratings)/float(num_ratings)
    return dict(num_ratings=num_ratings, avg_rating=rating)
This method returns a json stream to the widget which is then read as a response by the javascript on the client side.
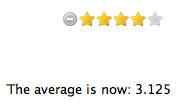
Now, this is not a terribly interesting example until you start to handle the response that comes back. To do that, you just add an “on_click” parameter to the widget definition.
<div id="avg_stars"/>
First we modify the template to give a place to hold the data that comes back from the server.
rating = Rating(id='my_rating',
                action='rating',
                label_text='',
                on_click="""$('#avg_stars')[0].textContent='The average is now: '+response.avg_rating""")
The ‘response’ javascript variable will hold an object which is your extracted json stream. In this case, we are displaying the average rating. It is important to note that the star widget uses the jQuery library, and the ‘$’ operator may not work the same in other libraries.
