Using ToscaWidgets to Create Forms
Introduction
One of the most useful features of ToscaWidgets is the ability to create forms with requisite validation with a simple declarative syntax. Using existing form widgets, it is relatively easy to add forms to your application to manage your database interactions.
The overall process for creating a form is as follows:
- Create widgets for each field in the form.
- Create a form widget passing in the field widgets as children.
- If you are creating an edit form, extract the row data from the database.
- Call the widget in your template, passing in row data when appropriate.
An example project has been attached so that you can try this easily.
Tutorial
For this tutorial, we will be implementing a form to add a movie to a movie database. Let’s create a new example project to try this out:
$ paster quickstart ToscaSample
Confirm the package name toscasample. We don’t need authentication
and authorization for this sample project.
Let’s start with a simple SQLAlchemy model that has only a Movie
object. Add the following line at the bottom of
model/__init__.py:
from movie import Movie
Now create a new Python module model/movie.py as follows:
"""The Movie database class"""

from sqlalchemy import Column
from sqlalchemy.types import Date, Integer, String, Text

from toscasample.model import DeclarativeBase


class Movie(DeclarativeBase):

    __tablename__ = 'movie'

    id = Column(Integer, primary_key=True)
    title = Column(String(100), nullable=False)
    description = Column(Text, nullable=True)
    year = Column(Integer, nullable=True)
    genre = Column(Integer, nullable=True)
    release_date = Column(Date, nullable=True)
    picture_filename = Column(u'picture_filename', String)


    def __str__(self):
        if self.year:
            return '"%s" (%d)' % (self.title, self.year)
        else:
            return '"%s"' % self.title
Our movie has a smattering of the different standard data types so that we can show off some simple ToscaWidgets form widgets.
To setup your database you should run the following:
$ paster setup-app development.ini
This will create the database schema in the database referenced in your development.ini configuration file.
A very Basic Form
We now want to create a simple input form widget for the model object.
In order to arrange our code more clearly, we create a new subpackage
widgets in our project by adding a new subdirectory widgets
with an empty __init__.py file in it. The widgets subdirectory
should be on the same level as the controllers and model
subdirectories. Inside the widgets subdirectory, we create a
module movie_form.py containing the following very simple form
widget:
"""Movie Form"""

from tw.api import WidgetsList
from tw.forms import TableForm, CalendarDatePicker, SingleSelectField, TextField, TextArea


class MovieForm(TableForm):

    class fields(WidgetsList):
        title = TextField()
        year = TextField()
        release_date = CalendarDatePicker()
        genre_options = [x for x in enumerate((
            'Action & Adventure', 'Animation', 'Comedy',
            'Documentary', 'Drama', 'Sci-Fi & Fantasy'))]
        genre = SingleSelectField(options=genre_options)
        description = TextArea()


create_movie_form = MovieForm("create_movie_form")
In ToscaWidgets, every widget can have child widgets. This is particularly useful for forms, which are generally made up of form field widgets. A simple way of defining forms is the declarative notation as used above.
Note that the standard Form widget does not have any associated
template, so we’re using the TableForm widget that already
provides a template with a very simple table layout.
Displaying The Form
We will now need a page template for displaying our form. Don’t
confuse this page template (describing how our form is embedded in a
web page) with the form template (describing the layout of the form
fields inside the form). For now we will use the default form
template that comes with TableForm. We will later also see how to
use our own form template.
Note that we’re using Genshi templates here, but we could just as well use another templating engine such as Mako.
For displaying our input form, we create a page template
new_form.html in the main templates directory that will be
usable as input page for other model objects, too:
<!DOCTYPE html PUBLIC "-//W3C//DTD XHTML 1.0 Transitional//EN"
  "http://www.w3.org/TR/xhtml1/DTD/xhtml1-transitional.dtd">
<html xmlns="http://www.w3.org/1999/xhtml"
  xmlns:py="http://genshi.edgewall.org/"
  xmlns:xi="http://www.w3.org/2001/XInclude">

<xi:include href="master.html" />

<head>
  <meta content="text/html; charset=UTF-8" http-equiv="content-type" py:replace="''"/>
  <title>New ${modelname}</title>
</head>

<body>

<h1>New ${modelname}</h1>

<div py:replace="tmpl_context.form(value)">Input Form</div>

</body>
</html>
Finally, We will also need a controller for displaying our input form.
The controller module needs to import the instance of this form that
we have already created in widgets.movie_form, and the template
context object that will allow us to pass the form from the controller
to the page template. So we add the following at the top of
controllers/root.py:
from tg import tmpl_context
from toscasample.widgets.movie_form import create_movie_form
Then we add an exposed method new() to the RootController
class in the same controller file:
@expose('toscasample.templates.new_form')
def new(self, **kw):
"""Show form to add new movie data record."""
tmpl_context.form = create_movie_form
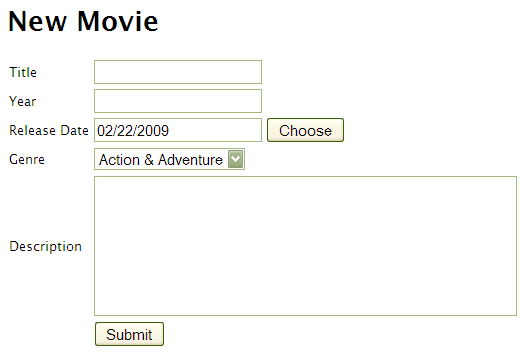
return dict(modelname='Movie', value=kw)
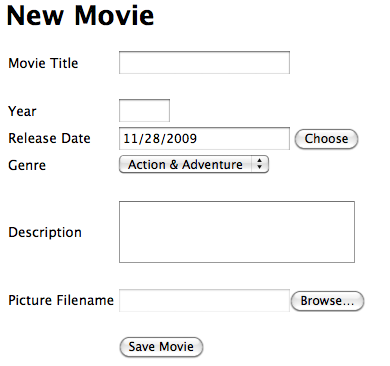
To run the application, surf to http://localhost:8080/new – you will see a form that looks like this:
Loading Options From The Database
Suppose we do not want to use hardcoded genre_options, but load
these options on the fly from the database. This is possible by
passing the options to the form widget at render time. To do this, you
would load the options in your controller method from an imaginary
MovieGenera model class and pass them to the template like this:
@expose('toscasample.templates.new_form')
def new(self, **kw):
    """Form to add new movie data record."""
    tmpl_context.form = create_movie_form
    return dict(modelname='Movie',
        genre_options=DBSession.query(MovieGenera.id, MovieGenera.title),
        page='ToscaSample New Movie')
Then in the page template you would display the form like this:
<div py:replace="tmpl_context.form(
    child_args=dict(genre=dict(options=genre_options)))">Input Form</div>
Simple Customization
Now, let’s take a look at what we can do to customize the form to our liking.
Each field has a set of attributes which we can change to suit our
needs. For example, perhaps you are not satisfied with the text area
which is the default in ToscaWidgets forms. You can change the
attributes of the text area simply by passing in a dictionary of
attributes to the attr parameter in the field definition. Simple
text fields also provide a size attribute.
You may have noticed that our form already contained labels next to
the input fields. These have been automatically generated from the
field names by capitalization and replacing underscores with blanks.
If this is not what you want, you can override these automatically
generated labels using the label_text attribute.
Another problem with this form is that if you are using SQLite, the
date is in the wrong format. Let’s give the CalendarDatePicker a
date_format argument, and then our form will be viable.
In order to arrange the field elements more clearly, you can use the
Label and Spacer widgets, or you can group fields that belong
together in a FieldSet container widget.
You can also change the text on the submit button with the
submit_text parameter.
After such customization, our widget.movie_form module may now
look like this:
"""Movie Form"""

from tw.forms import (TableForm, CalendarDatePicker, Label,
    SingleSelectField, Spacer, TextField, TextArea)


class MovieForm(TableForm):

    genre_options = [x for x in enumerate((
        'Action & Adventure', 'Animation', 'Comedy',
        'Documentary', 'Drama', 'Sci-Fi & Fantasy'))]

    fields = [
        TextField('title', label_text='Movie Title'),
        Spacer(),
        TextField('year', size=4),
        CalendarDatePicker('release_date', date_format='%y-%m-%d'),
        SingleSelectField('genre', options=genre_options),
        Spacer(),
        Label(text='Please provide a short description of the plot:'),
        TextArea('description', attrs=dict(rows=3, cols=25)),
        Spacer()]

    submit_text = 'Save Movie'


create_movie_form = MovieForm("create_movie_form")
The declarative notation we used earlier is a bit cumbersome in combination with spacers or labels, so we provided the fields simply as a list.
These changes result in the following new look of our form:
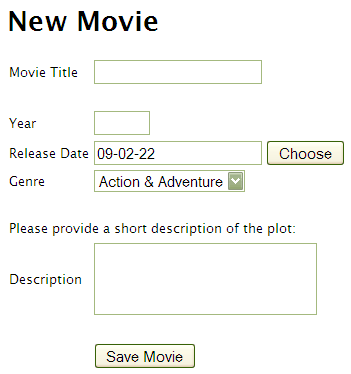
You will notice the different appearance and that that our date field now has dashes in it instead of slashes.
Customizing With CSS And Form Templates
We will now add some CSS and a modified template to our form in order to provide “tooltip-like” help texts for the individual form fields.
ToscaWidget forms already come with a help_text attribute. So
let’s add some help texts in our widget.movie_form module and see
what will happen:
"""Movie Form"""

from tw.forms import (TableForm, CalendarDatePicker,
    SingleSelectField, Spacer, TextField, TextArea)


class MovieForm(TableForm):

    genre_options = [x for x in enumerate((
        'Action & Adventure', 'Animation', 'Comedy',
        'Documentary', 'Drama', 'Sci-Fi & Fantasy'))]

    fields = [
        TextField('title', label_text='Movie Title',
            help_text='Please enter the full title of the movie.'),
        Spacer(),
        TextField('year', size=4,
            help_text='Please enter the year this movie was made.'),
        CalendarDatePicker('release_date', date_format='%y-%m-%d',
            help_text='Please pick the exact release date.'),
        SingleSelectField('genre', options=genre_options,
            help_text = 'Please choose the genre of the movie.'),
        Spacer(),
        TextArea('description', attrs=dict(rows=3, cols=25),
            help_text = 'Please provide a short description of the plot.'),
        Spacer()]

    submit_text = 'Save Movie'


create_movie_form = MovieForm("create_movie_form")
The result is not very appealing. Our help texts are simply inserted as span elements after their corresponding field elements:

What we really want is that our help texts will only appear if the user hovers with the mouse over the respective field.
One possible way to achieve this effect is to set the hover_help
attribute of the form widget to true:
class MovieForm(TableForm):

    hover_help = True
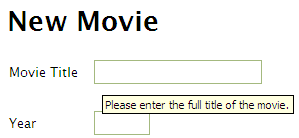
This will cause the help texts to be created as title attributes, which will give the “tooltip-like” behavior in most modern browsers:
We want to go a step further and have our own kind of tooltips on a colored background with a triangle acting as a pointer to the field.
To realize this, the default span element for the help texts is not
enough; we need an additional span element for the pointer triangle.
This is the point where we need to customize the default TableForm
template. So we create another templates package inside our
widgets package and copy the default Genshi template
table_form.html from tw.forms.templates into this new
toscasample.widgets.templates package. The only change that we
make is to replace the following line:
<span class="fieldhelp" py:if="help_text and not hover_help" py:content="help_text" />
with these lines that provide our additional span element:
<span class="fieldhelp" py:if="help_text and not hover_help">
    <span class="fieldhelp_top" />
    <span class="fieldhelp_main" py:content="help_text" /></span>
We also create a CSS file tooltips.css that we put into the
public/css directory of our project:
.fieldhelp {
	display: block;
	position: absolute;
	visibility: hidden;
	z-index: 99;
}

.fieldcol:hover .fieldhelp {
	visibility: visible;
}

.fieldcol:hover .fieldhelp:hover {
	visibility: hidden;
}

.fieldhelp_top {
	border-bottom: 18pt solid #fc3;
	border-left: 9pt solid transparent;
	border-right: 9pt solid transparent;
	display: block;
	font-size: 0;
	line-height: 0;
	width: 0;
}

.fieldhelp_main {
	background-color: #fc3;
	padding: 2pt 4pt;
}
We can now specify our custom template and CSS file in the
template and css attributes of our form widget. The
widget.movie_form module will look as follows after this step:
"""Movie Form"""

from tw.api import CSSLink
from tw.forms import (TableForm, CalendarDatePicker,
    SingleSelectField, Spacer, TextField, TextArea)
from tg import url


class MovieForm(TableForm):

    template = "toscasample.widgets.templates.table_form"
    css = [CSSLink(link=url('/css/tooltips.css'))]

    genre_options = [x for x in enumerate((
        'Action & Adventure', 'Animation', 'Comedy',
        'Documentary', 'Drama', 'Sci-Fi & Fantasy'))]

    fields = [
        TextField('title', label_text='Movie Title',
            help_text='Please enter the full title of the movie.'),
        Spacer(),
        TextField('year', size=4,
            help_text='Please enter the year this movie was made.'),
        CalendarDatePicker('release_date', date_format='%y-%m-%d',
            help_text='Please pick the exact release date.'),
        SingleSelectField('genre', options=genre_options,
            help_text = 'Please choose the genre of the movie.'),
        Spacer(),
        TextArea('description', attrs=dict(rows=3, cols=25),
            help_text = 'Please provide a short description of the plot.'),
        Spacer()]

    submit_text = 'Save Movie'


create_movie_form = MovieForm("create_movie_form")
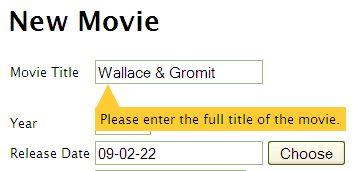
This was all that needed to be done to get the following nice effect when you hover with the mouse over one of the input fields:
Adding a File Upload
Now let’s add a file upload to see how that works. We will add a new file field to our form, and then on the serverside we will gather the data from the file form and save it to a file in the public directory on the server. This file could later be served up and displayed on our movie page.
The first thing we need to do is add the file field to our form.
First, add FileField to our import:
from tw.forms import (TableForm, CalendarDatePicker,
    SingleSelectField, Spacer, TextField, TextArea, FileField)
Then, add the field to the fields parameter of our widget:
FileField('picture_filename',
    help_text = 'Please provide a picture for this movie.'),
Spacer()
Our form now looks like this:
Now, if you look at the source for your page you will see that the enctype has changed in our form.:
<form id="create_movie_form" action="create" method="post" class="required movieform" enctype="multipart/form-data">
If you happen to be looking at this reference for pointers on how to
upload files, then this is important to note if you are not using
ToscaWidgets. enctype="multipart/form-data" is needed in order
to tell the web server that the form contains a multipart message,
including a file to upload.
Now we can modify our create method to save our new file to the public directory, noting the filename in the database. First, we need to locate our public directory:
import shutil
import os
from pkg_resources import resource_filename

public_dirname = os.path.join(os.path.abspath(resource_filename('toscasample', 'public')))
movies_dirname = os.path.join(public_dirname, 'movies')
Then we change the create code to save our filename to the database and our file to the public directory.
@validate(create_movie_form, error_handler=new)
@expose()
def create(self, **kw):
    movie = Movie()
    movie.title = kw['title']
    movie.year = kw['year']
    movie.release_date = kw['release_date']
    movie.description = kw['description']
    movie.genre = kw['genre']

    #save the filename to the database
    movie.picture_filename = kw['picture_filename'].filename
    DBSession.add(movie)
    DBSession.flush()

    #write the picture file to the public directory
    movie_path = os.path.join(movies_dirname, str(movie.id))
    try:
        os.makedirs(movie_path)
    except OSError:
        #ignore if the folder already exists
        pass

    movie_path = os.path.join(movie_path, movie.picture_filename)
    f = file(movie_path, "w")
    f.write(kw['picture_filename'].value)
    f.close()

    flash("Movie was successfully created.")
    redirect("list")
Now if you check the public directory after an insert you will see the file has been written. This file could be used in the listing or display of the movie information, since it has been placed in the public directory.
More Form Fields
ToscaWidgets contains some more form useful form fields. These can be classified into basic fields, selection fields and buttons. Fieldsets and forms themselves are actually realized as form fields that can contain a list of other form fields.
The ToscaWidgets documentation has a list of all available form fields.
Form Validation
Form validation is a very powerful way to make sure that the data entered by users is formatted in a predictable manner long before database interaction happens. When data entered into a form does not match that which is required, the user should be redirected back to the form to re-enter their data. A message indicating the problem should be displayed for all fields which are in error at the same time. ToscaWidgets takes advantage of the work done in FormEncode to do its validation.
The first thing we need to do is add a validator to each of the fields
that we would like to have validated. Each form field takes a
validator argument. The form itself is then passed into a method
decorator which checks to see whether the data coming in from the
client validates against the validator defined in the widget. Our new
widget.movie_form module with validation looks something like
this:
"""Movie Form"""

from tw.api import CSSLink
from tw.forms import (TableForm, CalendarDatePicker,
    SingleSelectField, Spacer, TextField, TextArea)
from tw.forms.validators import Int, NotEmpty, DateConverter
from tg import url


class MovieForm(TableForm):

    template = "toscasample.widgets.templates.table_form"
    css = [CSSLink(link=url('/css/tooltips.css'))]
    show_errors = True

    genre_options = [x for x in enumerate((
        'Action & Adventure', 'Animation', 'Comedy',
        'Documentary', 'Drama', 'Sci-Fi & Fantasy'))]

    fields = [
        TextField('title', validator=NotEmpty,
            label_text='Movie Title',
            help_text='Please enter the full title of the movie.'),
        Spacer(),
        TextField('year', validator=Int(min=1900, max=2100), size=4,
            help_text='Please enter the year this movie was made.'),
        CalendarDatePicker('release_date', validator=DateConverter(),
            help_text='Please pick the exact release date.'),
        SingleSelectField('genre', options=genre_options,
            help_text = 'Please choose the genre of the movie.'),
        Spacer(),
        TextArea('description', attrs=dict(rows=3, cols=25),
            help_text = 'Please provide a short description of the plot.'),
        Spacer()]

    submit_text = 'Save Movie'


create_movie_form = MovieForm("create_movie_form",  action='create')
Note that we removed the date format from the CalendarDatePicker again. This is because the DateConverter will take whatever date is entered in the box and convert it to a datetime object, which is much better understood by SQLAlchemy than a date string.
Also note that we did not import the validators from
formencode.validators directly, but we imported them from
tw.forms.validators instead. You should always do this if you work
with tw.forms, since it makes sure that you will get versions of
the FormEncode validators that play well with the tw.forms module
(the validators used in our example are the same, though).
Our controller now gets a new validator decorator for the creation of
the movie entry. But first we need to import a couple of things at
the beginning of our controllers/root.py file:
from tg import tmpl_context, redirect, validate
from toscasample.model import metadata, DBSession, Movie
from toscasample.widgets.movie_form import create_movie_form
Then we can add an exposed create() method to the
RootController class in the same controller file, directly after
the new() method:
@validate(create_movie_form, error_handler=new)
@expose()
def create(self, **kw):
    """Create a movie object and save it to the database."""
    movie = Movie()
    movie.title = kw['title']
    movie.year = kw['year']
    movie.release_date = kw['release_date']
    movie.description = kw['description']
    movie.genre = kw['genre']
    DBSession.add(movie)
    flash("Movie was successfully created.")
    redirect("list")
Note that we have created the create_movie_form instance with
action='create' so that this controller method will be called when
the submit button at the button of the form is pressed.
The resulting form on a bad entry will give you a output like this:
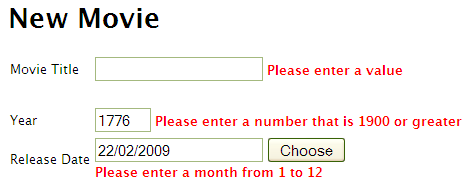
In short, there are many things you can do with validators, but the above example gives you a basic understanding of how validators can be used to check user input.
When the form validation passes, the create() method redirects to
an exposed list() method for displaying the list of movies, but we
haven’t created that method yet. It can look like this:
@expose("toscasample.templates.movie_list")
def list(self):
    """List all movies in the database"""
    return dict(movies=DBSession.query(Movie),
        page='ToscaSample Movie list')
To show the movie list, we also need to add a template named
movie_list.html in our main templates directory, which can contain
as little as this:
<!DOCTYPE html PUBLIC "-//W3C//DTD XHTML 1.0 Transitional//EN"
  "http://www.w3.org/TR/xhtml1/DTD/xhtml1-transitional.dtd">
<html xmlns="http://www.w3.org/1999/xhtml"
  xmlns:py="http://genshi.edgewall.org/"
  xmlns:xi="http://www.w3.org/2001/XInclude">

<xi:include href="master.html" />

<head>
  <meta content="text/html; charset=UTF-8" http-equiv="content-type" py:replace="''"/>
  <title>Movie List</title>
</head>

<body>

<h1>Movie List</h1>
<ol>
  <li py:for="movie in movies" py:content="movie">Movie title and year</li>
</ol>

<p><a href="${tg.url('/new')}">Add a Movie</a></p>

</body>
</html>
As an exercise, you can try to make the movies in the list editable by
adding an update() controller method. This method must read the
corresponding data record and pass it to a template similar to
new_form.html, except that you must call the form widget with the
data that has been passed by the controller. You can also let the
new() method return None as data and use the same page template
for both controllers.
More Validators
The FormEncode documentation has a list of all available validators.
But remember to import these validators indirectly through
tw.forms.validators if you’re using them to validate ToscaWidget
form fields, because some of them (most notably UnicodeString)
have adapted versions which interoperate better with ToscaWidgets
forms. The tw.forms.validators module also provides some
additional validators that you may find useful.
You can also build compound validators (schemas) corresponding to fieldsets or whole forms.